Unlock the Power of Automated Email Replies with Salesforce Marketing Cloud's Reply Mail Management
Reply Mail Management (RMM) is a feature offered by Salesforce Marketing Cloud that allows marketers to effectively manage and automate the handling of email replies. When you send email jobs through Marketing Cloud, RMM takes care of processing the incoming replies, automatically forwarding them for personal review if necessary, or handling them in an appropriate manner based on predefined rules.
Without the RMM feature, marketers would have to manually handle tasks such as managing out-of-office replies, auto-replies, auto-forwards, and unsubscribes, in addition to addressing individual customer responses. RMM eliminates the need for manual intervention in these processes, saving time and effort for marketers.
RMM may not be able to address 100 percent of auto-replies. Nevertheless, in most cases, RMM successfully manages more than 90 percent of auto-replies.
Setting up RMM:
To set up RMM in Marketing Cloud, follow these steps:
- Contact Account Representative: Get in touch with your Marketing Cloud account representative to request a Sender Authentication package or RMM services individually if you haven't already purchased them. The account representative will forward your request to the provisioning teams.
- Update MX Records: you have to add MX records as required so all replies sent to your emails redirect to Marketing Cloud servers for processing. To know how MX records work refer here. Based on your marketing cloud instance, the correct MX record should be added to your email domain. The details for the same can be found here.
- Configure RMM: Within Marketing Cloud Setup, search for "Reply Mail Management" and complete the information in the "Reply Address Definition" section. This includes specifying the From name, reply subdomain, email reply address, and confirming DNS record redirect completion.
- Reply Filters: Configure the reply filters based on your requirements. These filters determine whether RMM should delete auto-replies and out-of-office replies and whether it should systematically unsubscribe email addresses based on specific terms found in the email body and subject.
- Response Options: Select the desired response option for remaining replies, such as sending no automated response, using the default response email, or creating a custom response email.
- Route remaining emails: Define the routing email address to receive forwarded emails that don't match the filters.
Sender profile with Reply Mail Management (RMM)
Create a sender profile to override the response and reply address definition settings for a specific send. The sender profile allows you to manage replies from systems that use nonstandard protocols, ensuring that replies are sent using the from address instead of the Reply-To address.
To create a sender profile for use with Reply Mail Management (RMM) and perform the initial configuration of RMM in Marketing Cloud Setup, follow these steps:
Create a Sender Profile:
- Access Marketing Cloud Setup.
- In the app switcher, hover over your name and click "Setup."
- Search for "Sender Profiles" and select it.
- Click on the "New Sender Profile" button to create a new sender profile.
- Provide a name for the sender profile.
- Fill in the necessary information in the fields, including the From name and email address. This is the name and address that the message will appear to be from in the subscriber's email client.
- Configure Custom Reply Mail Management Settings:
- In the sender profile, scroll down to the "Custom Reply Mail Management Settings" section.
- Select the desired options based on your requirements:
- To override some account-level RMM features, select "Use custom settings below."
- To bypass the account RMM features and use the From address associated with the send, select "Use direct forwards." Note that this option disables the other settings in this section.
- In the "Forward to" section, select a multi-connect From option from the "Choose from list" option.
- Enter the name and email address in the "Use Specified Information" section. You can include personalization strings or static values in this section to ensure forwards are delivered to the proper location.
- Enable Forwarding using Triggered Send (optional):
- If you want to send forwarded replies using a specific triggered send instead of the original email, follow these steps:
- Enable "Forwarding using triggered send" in the RMM settings.
- Select a triggered send from the available options to send a specific triggered send type.
- Note that if this setting is not enabled, depending on your account settings, the reply address will receive the original email.
- Configure Custom Auto Reply (optional):
- If you want to send a custom auto-reply message using a triggered send, follow these steps:
- Enable "Use Auto Reply" in the RMM settings.
- Create a sender profile without Custom Reply Mail Management settings and a send classification to use with the auto-reply triggered send.
- Assign the sender profile to the send classification for your triggered sends.
- Create the triggered send for the auto-reply using the sender profile and send classification, and start the triggered send interaction.
- Create another sender profile and send classification to use with the triggered send for the auto-reply. Use this sender profile and send classification for the emails on which you want to activate auto-replies.
- Note that the display name from the auto-reply triggered sender profile will be the From name in the auto-reply message.
By following these steps, you can create a sender profile for use with Reply Mail Management and configure the necessary settings in Marketing Cloud Setup to manage email replies effectively.
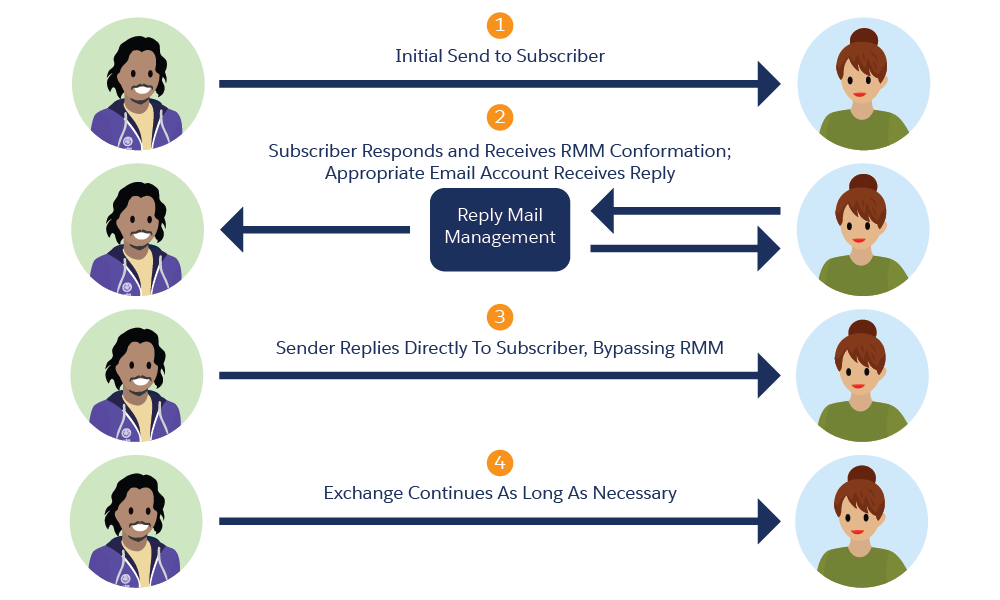
Complete RMM flow:
.png)
RMM VS Enterprise RMM:
RMM (Reply Mail Management) and Enterprise RMM are two features within Salesforce Marketing Cloud that help manage email replies, but they differ in their scope and functionality.
RMM (Reply Mail Management):
RMM is a feature available in Marketing Cloud that automates the handling of email replies for individual accounts or business units. It processes replies, including auto-replies, out-of-office replies, and unsubscribe requests, based on predefined rules and actions. RMM can send automated responses, delete auto-replies, and forward emails to designated addresses. It provides a streamlined approach to managing customer responses and maintaining customer engagement.
Key features of RMM include:
- Automated Response Handling: RMM automatically processes email replies based on configured rules and triggers, allowing for timely and personalized responses.
- Unsubscribe Management: RMM can handle unsubscribe requests, ensuring compliance with email regulations and managing subscriber preferences.
- Auto-Reply and Out-of-Office Handling: RMM can delete auto-replies and out-of-office replies, reducing unnecessary email clutter and improving email campaign performance.
- Forwarding of Emails: RMM can forward specific types of emails to designated email addresses for further action or review.
Enterprise RMM:
Enterprise RMM, also known as List-Level Unsubscribe, is an advanced feature available in Marketing Cloud that provides centralized control over unsubscribe management. It allows for managing unsubscribes at the list or business unit level, rather than at the individual account level. Enterprise RMM is particularly useful for organizations with complex subscriber structures or multiple business units.
Key features of Enterprise RMM include:
- List-Level Unsubscribe: Enterprise RMM allows for unsubscribing subscribers from specific lists or business units, providing more granular control over email preferences.
- Compliance and Governance: Enterprise RMM helps organizations ensure compliance with email regulations and maintain a consistent unsubscribe experience across different lists or business units.
- Unsubscribe Reporting and Analytics: Enterprise RMM provides comprehensive reporting and analytics on unsubscribe activities, allowing for better insights into subscriber preferences and engagement.
While RMM focuses on managing replies and automating responses at the account level, Enterprise RMM extends the functionality to manage unsubscribes at a higher organizational level, making it suitable for larger enterprises or businesses with complex subscriber structures.
Rules and collections:
In Enterprise Reply Mail Management (RMM) in Marketing Cloud, rules and collections are key components used to manage and automate the handling of replies to email campaigns. Let's explore each of them:
Rules:
Rules in RMM are predefined conditions and actions that determine how replies to email campaigns are processed and managed. These rules help automate the handling of incoming replies, categorize them, and trigger specific actions based on their content. Here are some examples of how rules can be configured:
- Auto-Forward Rule: This rule automatically forwards incoming replies to designated users or departments based on specified conditions. For example, you can set a rule to forward replies containing specific keywords or from certain senders to the customer support team for immediate attention.
- Auto-Reply Rule: An auto-reply rule triggers an automated response to incoming replies. This can be useful for acknowledging receipt, providing further information, or delivering personalized follow-ups. The rule can be based on criteria such as the subject line, keywords, or sender's email address.
- Unsubscribe Rule: This rule identifies unsubscribe requests in replies and automatically processes them, removing the corresponding email addresses from the mailing list. It helps manage opt-outs efficiently and ensures compliance with unsubscribe requests.
- Out-of-Office Rule: An out-of-office rule identifies out-of-office replies and can take various actions, such as flagging them, categorizing them, or excluding them from further processing.
- Manual Review Rule: This rule can be set up to flag certain types of replies that require manual review or attention from specific individuals or teams. For example, replies containing specific keywords or from VIP customers can be flagged for personalized handling.
Collections:
Collections in RMM are containers or groupings of rules that are applied to incoming replies in a specific order. Multiple rules can be grouped together in a collection, allowing for more advanced and granular control over the processing of replies. Collections are applied sequentially, with each rule evaluated in the order they are listed.
By organizing rules into collections, you can create a hierarchical structure to handle different types of replies and prioritize their processing. For example, you can have a collection for handling auto-replies, another for unsubscribe requests, and a separate one for manual review. This helps ensure that replies are processed in a logical and efficient manner.
Collections allow for flexibility and scalability in managing replies, as you can easily add, modify, or reorder rules within a collection without affecting other collections or the overall RMM setup.
In summary, rules and collections in Enterprise Reply Mail Management (RMM) in Marketing Cloud enable the automation and efficient management of replies to email campaigns. Rules define the conditions and actions applied to incoming replies, while collections group related rules to streamline their processing and prioritize actions based on specific criteria.
Enterprise RMM flow:

.png)


No comments:
Post a Comment